This is how you make iPhones child-friendly
Class chats, homework help, social exchange: in various areas during childhood smartphones are already a part of life. But what can you do to keep your child away from inappropriate content on their iPhone?
Around the age of 30, «it hits». Colleague A is going to be a mom, friend B is going to be a dad, and even your older sibling is knee-deep in nappies. Last but not least, it potentially «hits» you too. Whilst the early years are dominated by stuffed toys and building blocks, soon after starting school, the topic of mobile devices arises.
The good old homework book has already become obsolete in some places. Teachers are taking advantage of digitisation and communicating in chats. And once the ABCs are in place, communication with school friends will follow. As a result, this increases the risk of using other, possibly dubious services and websites in addition to Google, YouTube, and TikTok. With that comes the in-game purchases, phishing and other dangers too.
But how can you make sure that your offspring aren’t – voluntarily or involuntarily – looking at some nonsense on the net? Spending every evening browsing through their phone is no solution. The iPhone has a few options to help you navigate this which I’ll tell you all about in this guide.
The A-Z of child safety
Source: Florian Bodoky
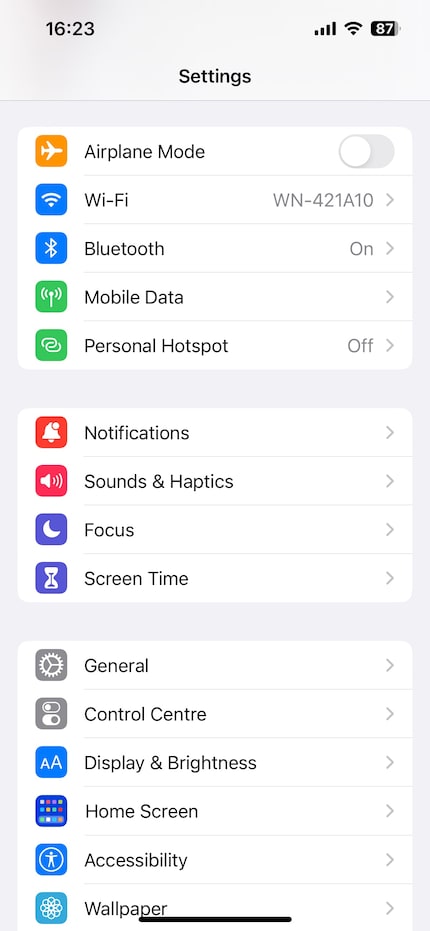
With its phones, Apple has made provisions. Under the somewhat cryptic name «Screen Time» hides a whole bunch of settings which can help you make the iPhone child-friendly. You find the menu in settings.
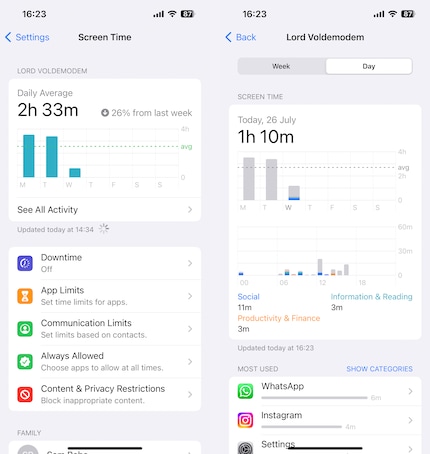
Daily Average/ See All Activity
If you want to get a general overview of your child’s usage, Apple provides you with one. Right on the start screen of the Screen Time menu, you’ll find a bar chart for the current week. This includes the average usage time and a percentage comparison to the previous week.
Source: Florian Bodoky
If you tap on «See All Activity» underneath, you can check the daily usage time and also see how much time has been spent on which app.
A break from the screen
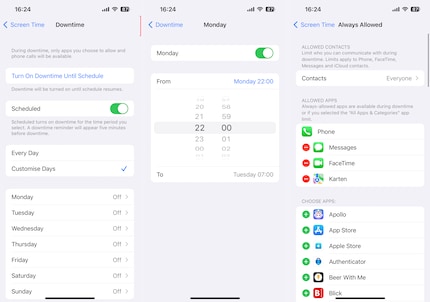
So that the phone doesn’t rob your little ones of sleep or distract them from their homework, you can set up Downtime.
Source: Florian Bodoky
Under «Screen Time» > «Downtime» you can decide which day of the week you want them to have a break from their phone and for how long. During this time, only the apps you have allowed to remain on will work. If you haven’t allowed any of them to work, they’ll still get telephone calls. You can choose which apps are allowed and who your child can call under «Screen time» > «Always Allowed».
Block apps (temporarily)
It’s undisputed. The knowledge of the internet has certainly helped with problems. Learning how to use it early on is also useful.
Source: Florian Bodoky
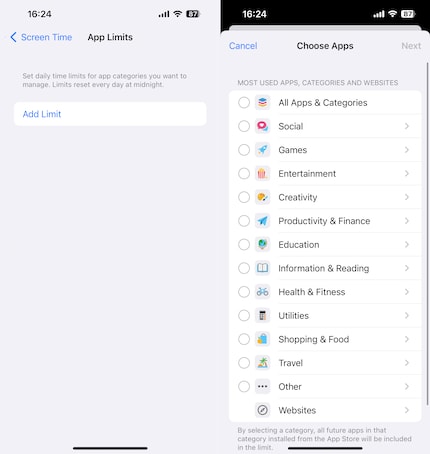
I’ve also heard in my circles that teachers require the students to access the internet for certain school activities. Okay. But then, how do you prevent them from consuming half an hour of Minecraft videos when all they should be doing is googling capital cities?
Source: Florian Bodoky
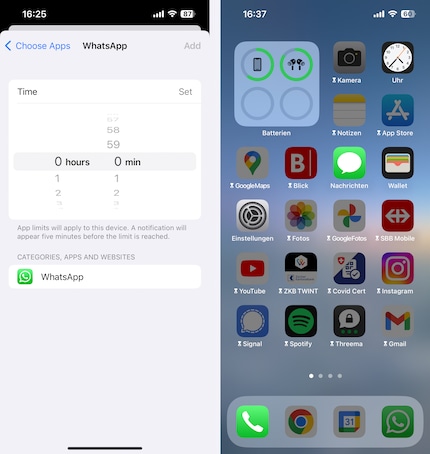
With «App Limits». Under «Screen Time» > «App Limits» you can set a daily time limit for each installed app. Select the app, tap «Next», set the duration, tap «Set», then tap «Add».
Communication – but with who?
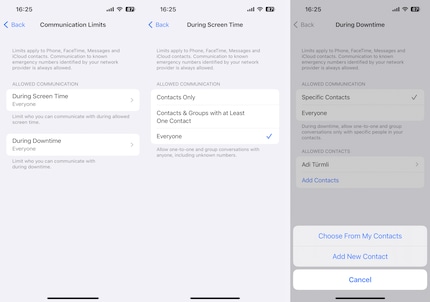
It can happen quickly: the number appears somewhere on the internet. Then health insurance companies call a 10-year-old child, or a call centre wants to get rid of its electric blankets. The solution for this – and of course for outgoing calls – are communication limits. In the same menu under «Screen time», you can manage who your child can contact or who they can receive calls and messages from.
Source: Florian Bodoky
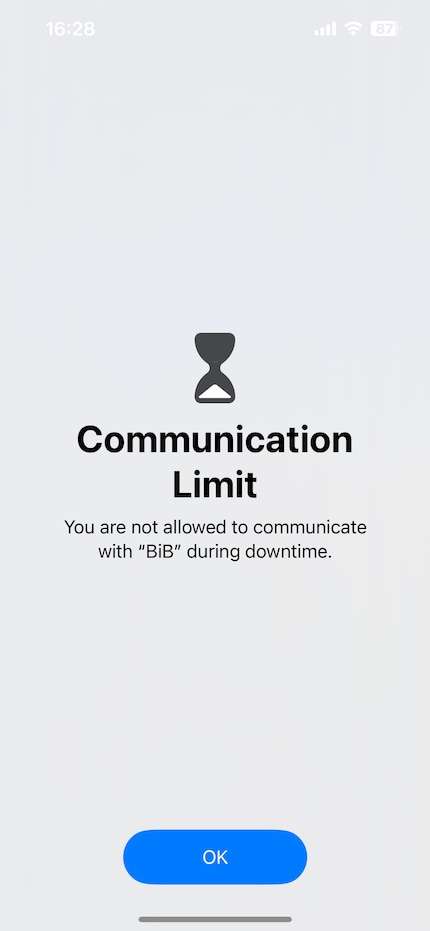
You can specify whether a restriction always applies or only during the planned downtime. If Downtime isn’t activated, you can either allow all incoming or outgoing calls, calls with saved contacts or group calls where at least one number is known. During Downtime, the «Everyone» option can’t be selected. Incoming calls are immediately rejected. Outgoing calls as well – you’ll see a message with a red hourglass and a reference to the blocked contact. It also states how much longer it’s scheduled to last, in minutes.
Source: Florian Bodoky
Important: your child can always call known emergency numbers. These numbers can’t be blocked.
Websites, app purchases and games
When you’re young, it may well be different. But as children get older, it’s often the case that their knowledge of technology is more advanced than their parents. So it’s good that you can block apps. But what about when your offspring download something off the App Store themselves? Or when they can see the content via browser – e.g. TikTok?
Source: Florian Bodoky
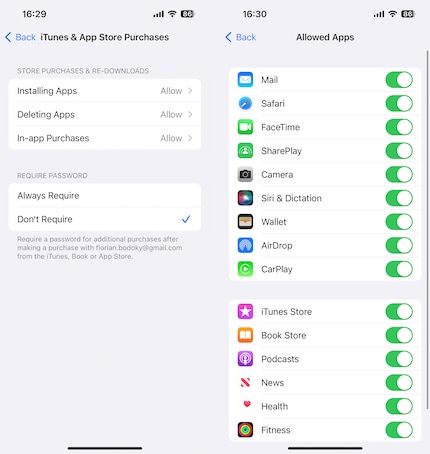
To prevent this from happening, you can go to «Content & Privacy Restrictions». This can also be found under «Screen Time». In «iTunes & App Store Purchases» you can stop new apps from being installed and all apps from being deleted. You can also disable In-app Purchases.
In doing so, Apple is not only countering a potential financial problem, but is also trying to put a stop to the loot box and pay-to-win problem (PDF in German). You can also prevent purchases from the app store by enabling a password entry for each purchase.
«Allowed Apps» does exactly what it says on the tin. Which apps are generally allowed to be used and which can’t be? If the device runs under the same Apple ID as your own iPhone, your app downloads may find their way onto your child’s device.
Source: Florian Bodoky
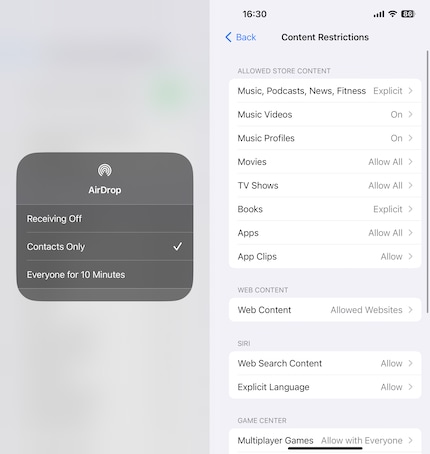
Tip: «AirDrop» is often forgotten. This allows content to be sent from one iPhone to another. And since an iPhone can be given a random name, this happens somewhat anonymously. Airdrop can be set to «Contacts Only» or «Everyone». «Everyone» means that any Tom, Dick and Harry could send your child inappropriate website addresses or pictures. It is limited to ten minutes though, and has to be reactivated afterwards. But it’s better to be too cautious than too lenient.
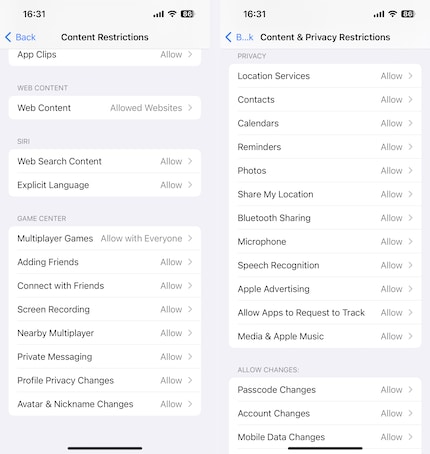
The «Content Restrictions» setting provides a somewhat more detailed fine-tuning. Here, you can restrict individual content of apps or web content. You can either allow everything or block adult content, for example, content of an erotic nature. If your children are still very young, you can fundamentally ban web content and only allow specific, child-friendly websites. The iPhone has some suggestions up its sleeve, but you can also type in the specific URLs yourself. Even the settings for Siri, the virtual assistant, can be censored, for example, what she’s allowed to search for and what she says. This way, explicit language becomes a thing of the past.
Source: Florian Bodoky
These changes can also be made in the Game Center. You can prevent your child being connected to strangers in multiplayer mode and from receiving private messages from these people in-game. Similarly, for some games there’s a «Nearby Multiplayer» mode. This checks if there’s anyone playing the same game nearby and then enables a multiplayer game. You can also disable this option if you want to prevent your child from coming into contact with strangers.
Last but not least, there’s also data protection. This is also located in the «Content & Privacy Restrictions» menu. There you can define, for example, which apps are allowed to track activity or which settings in which apps can be changed by your child. If you prohibit an app from tracking, the developer can’t create user profiles. However, if the app contains advertising, the ads will be played randomly.
Family Sharing
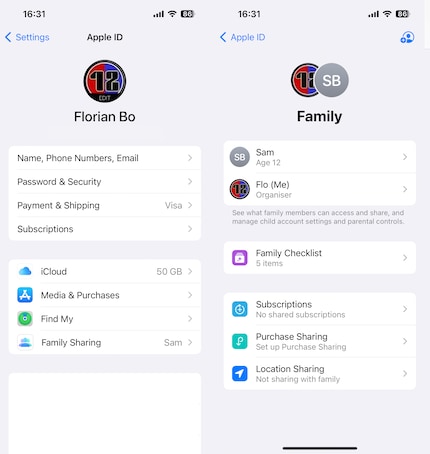
The heart of the family Apple-verse is Family Sharing. Thanks to this, you can add your family members and their Apple IDs to Family Sharing. Up to five more members can be added. If the family constellation is larger than six people, it gets complicated. But what does Family Sharing actually do and how can I set this up? I’ll show you. First, go to Settings, tap your Apple ID, and select «Family Sharing». Follow the set-up.
Source: Florian Bodoky
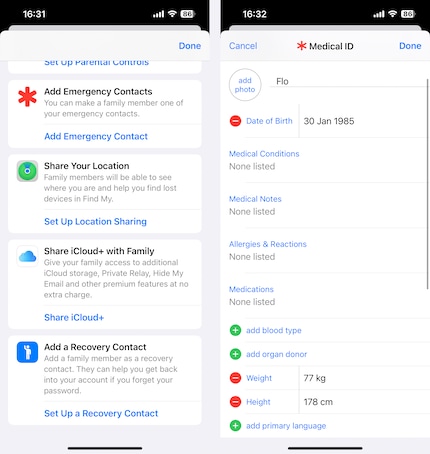
The first thing you see is the «Family Checklist». There you can add an emergency contact for everyone. Yourself, for example. The advantage of this is that you only have to do it once. Every family member now has you as an emergency contact. Should something happen to them, the person helping knows who to inform. Otherwise every member of the family can create a Medical ID which includes their medical notes. Allergies, medical history, blood group and so on. This is also helpful information.
Source: Florian Bodoky
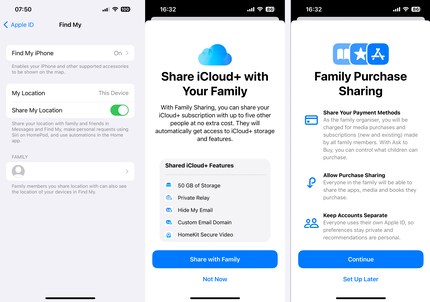
The second option is called «Share Location». You can specify whether you only want to share a location with certain family members or automatically with everyone. Obviously the same applies to children. The devices can then be located. This can be helpful if someone has taken the wrong bus or the iPhone has been lost.
Sharing your iCloud+ plan with the family is the third menu item. Share your Cloud storage with the family for free. Note: despite sharing the storage, they can’t see your personal content, such as photos and documents. You can’t see theirs either. You can also use family members for two-factor authentication. For example, if you forget the password of your Apple ID, a recovery code will appear on the phone of your «trusted contact».
Source: Florian Bodoky
Furthermore, you and your family can share subscriptions for free under «Subscriptions». If you have a paid app, your family members can use it for free. As the organiser, you can also share your payment methods and your purchases. Under «Purchase Sharing» you can determine if they can share your purchases (apps, books, videos) and/or if they can even use your payment method to buy things themselves from the App Store.
Add family members
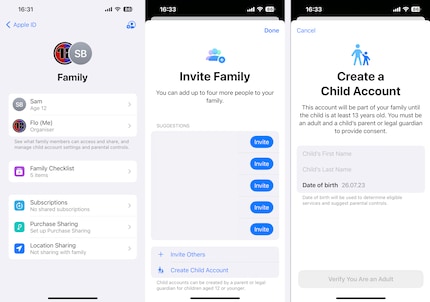
In settings, click on your Apple ID and then on «Family Sharing». After that, click the small blue cross in the top-right corner. Select the contacts you want to add (up to five).
Source: Florian Bodoky
There are four types of members you can select:
- «Organiser»: This is you, if you set up the sharing
- Adult Person: An adult member of the Family Sharing group. There’s no limits in terms of content, blocked apps etc.
- Parent: Has full rights and can help you with the configuration
- Child / Teen: Tap on the item «Create an Account for a Child» for more settings. There, you can set up the items «Subscriptions», «Purchase Sharing» and «Share location» separately for children (and also apply them to other children’s accounts)
The selected contact will then receive a message with an invitation. When they tap on Join, they’re in the group. Done.
Header image: Shutterstock29 people like this article
I've been tinkering with digital networks ever since I found out how to activate both telephone channels on the ISDN card for greater bandwidth. As for the analogue variety, I've been doing that since I learned to talk. Though Winterthur is my adoptive home city, my heart still bleeds red and blue.


